Template-Based AIG Platform Programming Guide
Table of Contents
- Table of Contents
- Introduction
- Variable Definition
- Template Section
- Generate Items
- Additional Features
- Miscellaneous Features
Introduction
The AIG platform is a free web tool that allows you to build template-based automatic item generation (AIG) multiple-choice items. Not only can you create discrete/standalone items but also testlet/set items where multiple items share a common stimulus. Once you create the template, you can generate items and select the items you want to download in Excel format. If you have any questions regarding this tool, please reach out to the author via yanfu.phd@gmail.com.
To start creating a new template, you can select discrete/testlet type items, the number of set members (set length) if you choose to create set items, and 4- (MC4) or 5-option (MC5) multiple-choice item type.
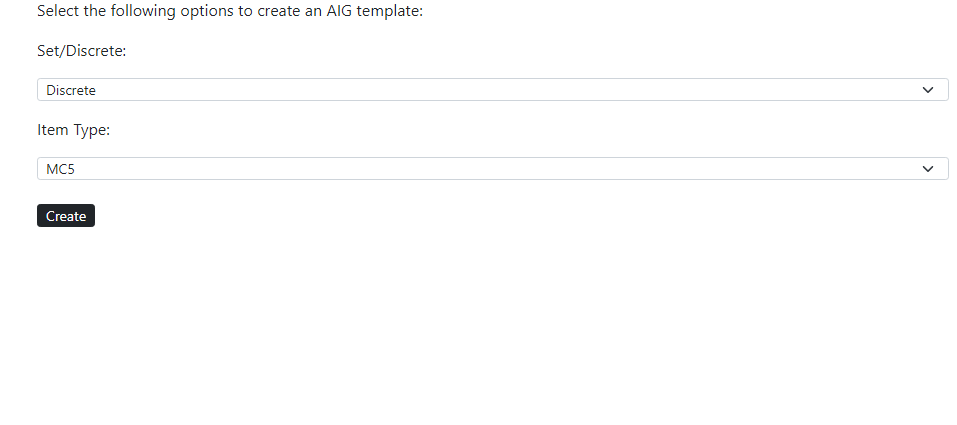
Once you make the selection and click create, you will be redirected to the main template creation page.
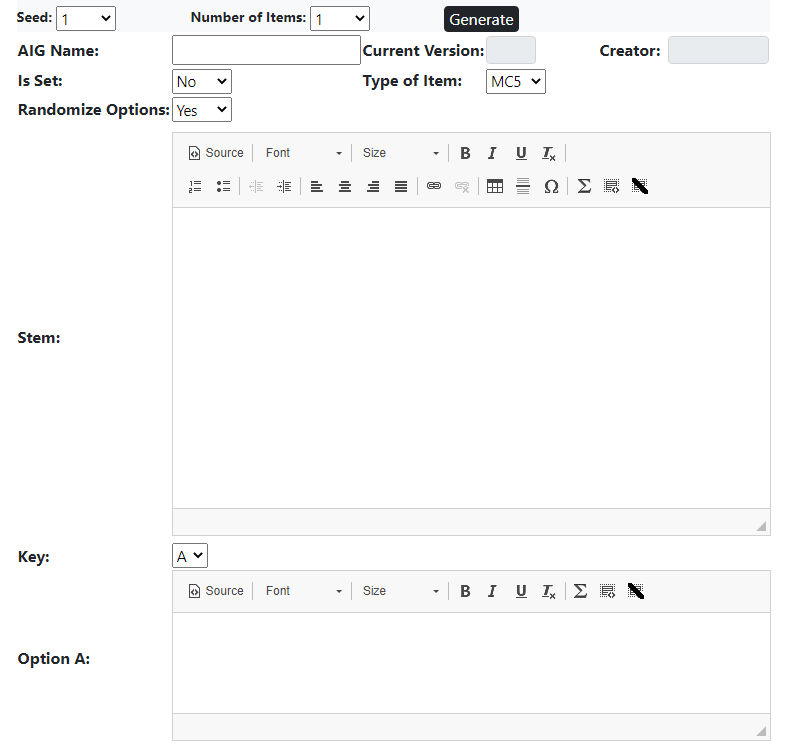
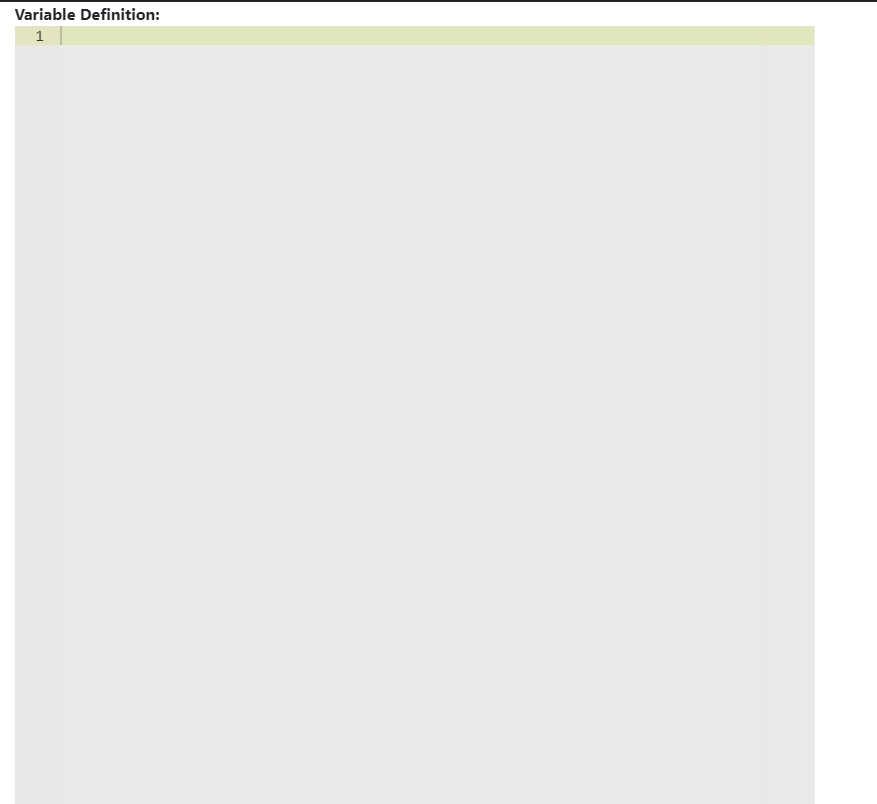
The main template creation page contains two sections: Template Section and Variable Definition Section. Template Section is for users to create a multiple-choice template's stems, options, key, and even a stimulus for testlet/set items. Variable Definition Section contains user-defined variables that can be included in Template Section and used for generating items.
This is Template Section:
This is Variable Definition Section:
Variable Definition
To fully understand variables in Template Section, you need to first understand how to define a variable, and use basic operators, constraints, and functions for controlling the variables.
Basic Operators
The AIG platform accepts the following operator types for defining and constraining a variable or doing runtime computation.
Math Operators
| Operator | Description |
|---|---|
| + | Addition |
| - | Subtraction |
| / | Division |
| * | Multiplication |
| ** | Exponent |
Logical Operators
| Operator | Description |
|---|---|
| != | Not equal to |
| == | Equal to |
| > | Greater than |
| < | Less than |
| >= | Greater than or equal to |
| <= | Less than or equal to |
Name
You can define a variable in the Variable Definition Section. It can be any letters plus numbers without any space, and it's case-sensitive, which means that any two words with different cases of letters are essentially different variables.
For example, if you want to define a variable called bus as SINGLE type, you can use the following syntax.
SINGLE bus = red bus|blue bus
To refer to a variable in Template section, or Variable Definition Section, the name needs to be surrounded by @..@ signs without any whitespace. For example, if the name is "bus", and the variable should be:
@bus@
Type
You can define three types of variables: SINGLE, ARRAY, and FUN. The differences among those three types will be discussed here in detail.
SINGLE Type
The SINGLE type outputs one value from a defined array after "=".
SINGLE color = red|blue|yellow
or
SINGLE num = 1,9 by 1
ARRAY Type
The ARRAY type generates a list of values from a defined array after "=".
ARRAY color = red|blue|yellow
or
ARRAY num = 1,9 by 1
FUN Type
The FUN type outputs one value based on the defined function after "=".
FUN num2 = MIN(2,3)
or
FUN num3 = 1+2
Assign Value To Variable
You can use "=" to assign possible values to each variable type.
You can define a specified list of values for both SINGLE type and ARRAY type. The only difference is that for SINGLE type, only one value is randomly selected, and for ARRAY type, all possible values are randomly generated. After "=", you can define: sequence, list, and predefinied array.
Sequence
The sequence type uses a starting value, an ending value, and a step size (i.e., first, last by step) to create a list of numeric values. For exmaple,
1, 10 by 1
will generate a list of 10 values from 1 to 10 with an increase of 1 at each step. For SINGLE Type, a value will be randomly selected from the list, and for ARRAY Type, all values will be randomized and used.
List
The list type uses "|" to separate the manually created list (element1|element2|element3). It can be used to create a list of numeric values or non-numeric values. For example,
bus1|bus2|bus3
will generate this list: bus1, bus2, and bus3. IMPORTANT: the white space before and after the words will be removed. For SINGLE Type, a random value will be selected from the list, and for ARRAY Type, all values will be randomized and used.
Predefined ARRAY
If you define an ARRAY variable (e.g., var) before, you can refer to the variable here, but you can use the variable or in combination with other syntax.
@var@
Similarly, for SINGLE Type, a value will be randomly selected from the list, and for ARRAY Type, all values will be randomized and used.
Subscript
For ARRAY Type, you can specify one element from a list using the variable name with a subscript in Template Section and Variable Definition Section. For example, the first element from variable "A" can be referred to like this:
@A[1]@
You can use subscripts to specify multiple values of the same variable, and the values will not be overlapped when they are used in the same item.
For FUN type, the condition is used to assign values and functions to the variable. The functions to assign values are listed as follows:
| Function | Description |
|---|---|
| = | assign a value or formula to the variable. For example, =@var1@+2 assigns a value from variable var1+2 to the variable. |
| GCF (a,b) | assign the greatest common factor to the variable |
| LCM (a,b) | assign the least common multiple to the variable |
| COMB (n,k) | assign the combination of selecting k elements out of n elements to the variable |
| FCTRL (k) | assign the factorial of k to the variable |
| SQRT (a) | assign the square root of a to the variable |
| ROUND (a,n) | round a to n digits after the decimal point, and assign it the variable |
| MIN (a,b) | get the smallest value between a and b and assign it to the variable |
| MAX (a,b) | get the largest value between a and b and assign it to the variable |
| ABS (a) | get the absolute value and assign it to the variable |
| LOG (a) | get the log value of a and assign it to the variable |
| EXP (a) | get the exponent value of a and assign it to the variable |
Other Tips
You can also add SINGLE Type variable that you defined earlier to define a sequence.
1, @var@ by 1
Constrain
For SINGLE and ARRAY variables, you can constrain the range of the variables. You can have multiple conditions for a single variable, and they need to be separated by ";".
Constrain num: >0;<10
means that generated values need to be greater than 0 and smaller than 10. You use logical operator and constraints to set up multiple constraints.
You can also use a predefined SINGLE type variable, or subscript to constrian.
Constrain num: >@var1@;!=@fruit[2]@
For constraints other than logical operator, you can use the following list to add other constraints.
Constraint List
| Constraint Type | Description |
|---|---|
| EVEN | The values have to be an even number |
| ODD | The values have to be an odd number |
| SQUARE | The values have to be a square |
| CUBIC | The values have to be a cubic |
| PRIME | The values have to be prime |
| NONPRIME | The values have to be non-prime |
| FACTOR (a) | The values have to be a factor of a |
| NONFACTOR (a) | The values have to be not a factor of a |
| MULTIPLE (a) | The values have to be a multiple of a |
| NONMULTIPLE (a) | The values have to be not a multiple of a |
| CMFACTOR (a,b) | The values have to be a common factor of a and b |
| CMMULTIPLE (a,b) | The values have to be a common multiple of a and b |
Syncing
Sync function can be used to maintain the same ordering of two SINGLE variables. It's only available for SINGLE type variable. Additionally, the two variables have to have the same length. For example, if variable 1 is syncing with variable 2 using the following syntax, whenever the first value of variable 1 is generated, the first value of variable 2 will also be generated, so and so forth.
variable 1
SINGLE var1= booklet|magazine|email
variable 2
SINGLE var2= red|green|dead
Constrain var1: sync(@var1@)
In this case, when "booklet" is selected for variable 1 , "red" will be selected for variable 2.
Template Section
The template section contains stems, options, and even a common stimulus for testlet items. In addition to any text you want to insert, you can add math equations using latex, create an image using innate syntax, and compute formula in runtime (i.e., item generating time) not in the variable definition section.
Latex
To use math latex, all the latex math equations have to be surrounded by
signs:
$$ \frac{a}{b} $$
If there are variables inside of a formula, they will be replaced by their values. For example, if the variable @A@ is 2 for one of the generated items:
$$ \frac{2+@A@}{5} $$
will be shown as:
$$ \frac{2+2}{5} $$
Generate Images
You can also use image syntax to create an image. The image syntax needs to be surrounded by ##image .. image## tags. All the keywords (e.g., CANVAS, circle) are not case-sensitive. Each command must end with ; .
In the image settings, you can adjust the size of the canvas(the width and height of the image in pix ), the minimum and maximum of the x and y axises, and unit size (number of pixes per unit), turn on/off the axis, turn on/off the grid, turn on/off the axis ticks with labels, adjust the grid color, global font-size, global font-weight (normal/bold), and global font-family.
You can create figures like dot, line, square, rectangle, triangle, circle, ellipse, polygon, and even text. You can also move a group of figures to different locations.
You can also add variables, and they will be replaced by their values during the runtime.
You can add inline comment inside of image tags, and the comments will be deleted during the item generation.
You can also use graph renderer to check the image/graph you create. The graph renderer generates the graph instantly as you insert each line of syntax. Here is a sample code for generating image syntax.
##image

    CANVAS:200,200; /*The width and height of the canvas in px unit*/
    XAXIS_MIN:-10; /*The lowest actual value of the X-axis */
    XAXIS_MAX:10; /*The highest actual value of the X-axis. */
                  /*If xaxis_min is specified, it will be ignored*/
    YAXIS_MIN:-2; /*The lowest actual value of the y-axis */
    YAXIS_MAX:10; /*The highest actual value of the Y-axis. */
                  /*If yaxis_min is specified, it will be ignored*/
    UNIT_PX_SIZE:10; /* number of pixes per unit*/
    AXIS:on; /* turn on the x- and y- axises.*/
    GRID:on; /* turn the grid on*/
    GRID_COLOR:lightblue; /* change the grid color, the default is black*/
    LABEL:on; /* add ticks for the axises and labels of the ticks */
    FONT_SIZE: 1; /*Global font size*/
    FONT_WEIGHT: bold; /*Global font weight*/
    FONT_FAMILY: Arial; /*Global font family*/


    TEXT:10,15,A2; /*Draw text: location x,location y, text, optional(font size, font weight(bold/normal), font family), it will overwrite the gobal font settings.*/


    LINE:1,2,3,4; /* Draw a line: starting location x, starting location  y, ending location  x, ending location y*/

    DOT:1,1,0.1; /* draw a dot:location x, location y, size of the dot*/
    CIRCLE:15,15,9;/* Draw Circle: center x, center y, radius*/
    ELLIPSE:10,15,4,4; /* Draw ellipse: center x, center y, radius 1, radius 2*/

    TRIANGLE:1,12,4,5,15,2;/*Draw triangle: x1,y1, x2,y2, x3,y3*/
    RECTANGLE:10,20,10,20; /* Draw a rectangle: starting location x, starting location y, width, height*/
    SQUARE:3,4,4;/* Draw a square: starting location x, starting location y, width*/
    POLYGON:3,4,4,5,6,7,8,9;/* Draw a polygon: define as many pair of x and y as you want */

image##
Image Settings
Here is the list of common image settings and their default values .
| Syntax | Description |
|---|---|
| CANVAS: width, height | The width x and height y of the canvas in px unit. Default is 400 for weight and 400 for height |
| XAXIS_MIN: min | The lowest actual value of the X-axis. Default is 0 |
| XAXIS_MAX: max | The highest actual value of the X-axis. If xaxis_min is specified, it will be ignored |
| YAXIS_MIN: min | The lowest actual value of the Y-axis Default is 0 |
| YAXIS_MAX: max | The highest actual value of the Y-axis. If yaxis_min is specified, it will be ignored |
| UNIT_PX_SIZE: size | Number of pixels per unit. Default is 20 |
| AXIS: on/off | Turn on/off the x-axis and y-axis. Default is off |
| GRID: on/off | Turn on/off the grid. Default is off |
| GRID_COLOR: lightblue/black/.. | Change the grid color. Default is black |
| LABEL: on/off | Add/Delete the ticks and labels of the axis |
| FONT_SIZE: 11 | Set global font-size. Default is 12 |
| FONT_WEIGHT: normal | Set global font-weight. Default is normal |
| FONT_FAMILY:Arial | Set global font-family. Default is Arial |
Figures
Here is the list of figures you can create.
| Syntax | Description |
|---|---|
| TEXT: x, y, content,font-size*, font-weight*, font-family*; | Draw text content at location x and y. You can set the font size, font weight (normal/bold), and font family in sequential order. |
| LINE: x1, y1, x2, y2 | Draw a line with starting location x1 and y1, and ending location x2 and y2 |
| DOT: x, y, size | Draw a dot at location x and y with a certain size |
| CIRCLE: x, y, radius | Draw a circle at center x and y with a certain radius |
| ELLIPSE: x, y, radius 1, radius 2 | Draw an ellipse at center x and y with a certain radius 1 and radius 2 |
| TRIANGLE: x1,y1, x2, y2, x3, y3 | Draw a triangle using the three locations: x1,y1, x2, y2, x3, y3 |
| RECTANGLE: x, y, width, height | Draw a rectangle with the left corner at location x and y and with certain width and height |
| SQUARE: x, y, width | Draw a square with the left corner at location x and y and with certain width |
| POLYGON: x, y, .... | Draw a polygon with as many pairs of x and y as you want |
| TRANSLATE: x, y | Move the following figures from 0, 0 to x, y |
| ROTATE: angle, x, y | Rotate the following figures with certain angle based x, y |
*are optional.
Compute Values in Runtime
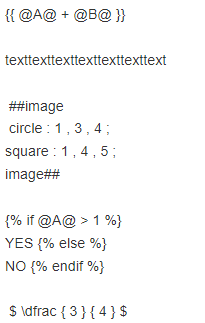
In any place of Template Section, you can compute values in runtime, which means that those values will be computed during the item generation process. All you need is to put the values that need to be computed in the @{ }@ tags like this:
@{ 2+4+3 }@
will be shown as 9.
If there are variables inside of the @{ }@, the variable values will be replaced and then the values will be computed. For example, if var1 is 3, and var2 is 4,
@{ @var1@ + @var2@ }@
will be shown as 7.
If-else Statement
In any place of Template Section, you can use the following syntax to create an if-else-statement (You can refer to logical operator for more information about the logic types that are allowed in the if part).
Assume var1 is a list of values from 1 to 10 separated by 1. The following syntax will become "Yes" when var1 is greater than 5, and "No" otherwise.
{% if @var1@>5 %} Yes {% else %} No {% endif %}
Assume var2 is a SINGLE value from this list: Apple | Banana, the following syntax:
{% if @var2@==Apple %} an {% else %} a {% endif %}
will be "an" when var2 is an apple, and "a" when var2 is "banana".
You can also use simple if-statement without else like this:
{% if @var1@>5 %} Yes {% endif %}
Inline Commenting
In the Template Section and Variable Definition Section, you can insert comments anywhere that are surrounded by /* .. */, and they will be ignored during the item generating process.
/* The text here will be not displayed in the generated items */
Highlight/Unhighlight Variables
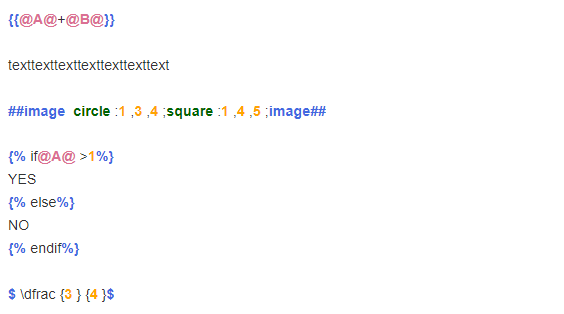
In the Template Section, text and variables are displayed in plain black and white text but also can be color-coded. You can click the Variable Highlight button  to color-code the variable, brackets, and other keywords.
 .
.
You can also click  to remove the color coding.
 .
.
WARNINGS: adding highlight or removing highlight may make some important whitespace and linebreak dispear. You need to add them back manually.
Add Table
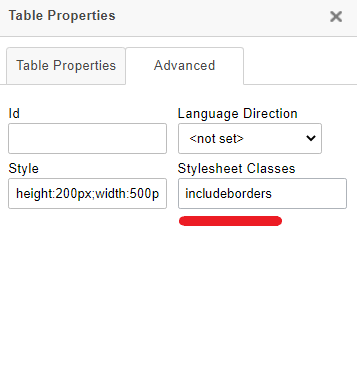
You can click the table button to add a table in the item stem or stimuli.

If you want to add borders to every cell of the table, you need to add "includeborders" to the Stylesheet Classes of the Table Properties.
Generate Items
You can test your template by generating items. You can specify a random seed so that all generated items with the same seed will have the same variable values and the number of items you want to generate. Once you click the generated items, you can see the generated items.
Seed
You can set the seed value from 1 to 100.
Number of Items
You can set the number of items you want to generate from 1 to 100.
Duplicated Options Check
If there are any duplicated options in the generated items, the AIG system will give you warnings when you generate items.
Randomize Option Sequence
You can randomize the options by setting Randomize Options to Yes, and each generated item's correct option will be a random option rather than the option (Key) you set.
Additional Features
When you register and sign in (completely free), you can enjoy additional functionalities like: storing commonly-used variables, saving templates and tracking the changes to the template using version control, and saving the generated items and selecting the ones to download.
Commonly-Used Variables
You can use add variable function to save a commonly-used list variable, so you don't have to redefine it from scratch every time. The added variable will be displayed in the Variable List once you add it..
 ,
,
Version Control
You can save a version of an AIG template, and go back to any version you previously created.
Save Generated Items
After finishing testing the generated items, you can save the generated items by clicking Output button, you can select the generated items and downloadthem in a csv format file by clicking the Download button.
 ,
,
Miscellaneous Features
Graph Renderer
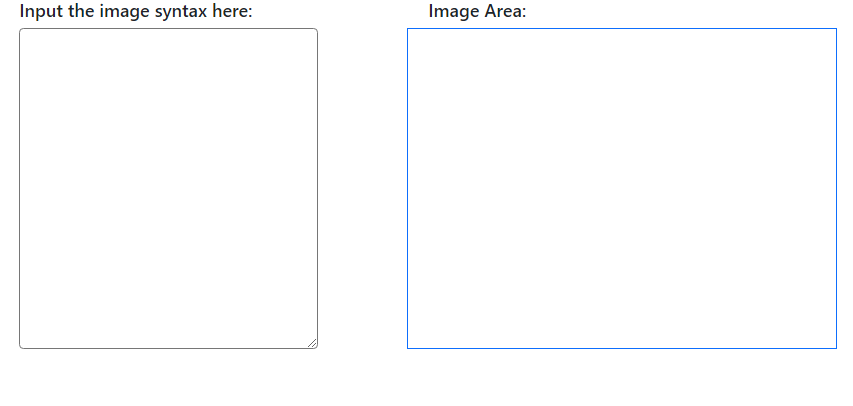
You can use the graph renderer to check the image syntax in real time. Whatever you put in the left box, if the syntax is correct, it will generate a graph instantly on the right side. Here is a screenshot of the graph renderer interface.
 .
.